Introduction To Per Pixel Rendering
This article covers how to create and use a pixel grid in Desmos. Pixel grids are the foundation for many of the cool things you see people make with Desmos, such as fractals and raytracers. In the next article we will look at how to use a pixel grid to create a basic raytracer.
What's the difference? #
You may be asking, why would I want to do per pixel rendering, and how is it any different than rendering meshes using the function? Rendering using the polygon function has one very significant limit: polygons must be a single colour, and most modern rendering methods require you to be able to modify not just the colour of every polygon in the scene, but every pixel on your screen. This is where per-pixel rendering comes in.
Drawing pixels #
Instead of having each polygon in our scene have its own colour, now we need to have each pixel on our screen have its own colour. Since we dont have any way to directly to do this with the calculator (without resorting to things like implicits), we will need to draw our own pixels. For now lets just try to generate a grid of points on the screen.
The easiest way to do it is with a nested list comprehension, if you are familiar with other programming languages this is equivalent to a nested for loop. Right now we will focus on generating a square, so the simplest way to do it is to chose some resolution you want, and then loop from -resolution to +resolution in both the x and y directions creating a point at each step. We'll also add a way to scale the screen, so that the higher the resolution the closer together the points will be to maintain a constant size. This can be done by multiplying the x and y coordinates by .
This works great, but there is a very obvious drawbacks to using points: they are circles. Circles cannot effectively tile a plane, so we end up with gaps in our grid.
Quick aside: Screen space coordinates #
Screen space coordinates are a coordinate system that is the same as the one we use to draw pixels. You may be familiar with some examples, for example if you have ever opened MS Paint and looked at the bottom left corner you will see the coordinates of your mouse. This is screen space coordinates. The x coordinate is the number of pixels from the left edge of the screen, and the y coordinate is the number of pixels from the top edge of the screen. This is the coordinate system we will be using to draw on the screen. In our case screen space coordinates will be in the range in both the x and y directions, and the origin will be in the center of the screen, ie equivalent to the regular coordinate system.
Drawing better pixels #
A much better option is something we already know: polygons. Using polygons we can make a square and place at every point on the screen and scaling it appropriately. We can create a list of points that represent a unit square, and then using another list comprehension we can place a square at every point on the screen. We can also use the same scaling trick as before to make sure that the squares stay roughly the same size no matter the resolution.
Great, now we have a grid of squares, but how do we actually address them?
Drawing on the screen #
Now that we actually have a grid, we still have to draw to them somehow, and the answer is: custom colours! We can use either the or functions to create a custom colour, and then assign that colour to our screen. By using the same list comprehension we used to create the grid to create we can create a way to broadcast to every pixel on the screen.
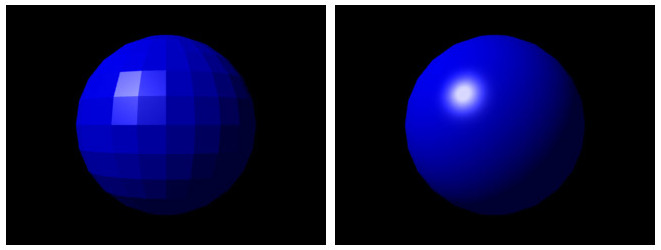
As an example lets do something simple: a basic point light. First we'll create a point which will represent the position of some light in screen-space coordinates, and then for each pixel we will find the distance from it, and with that using the inverse square law we can calculate the brightness of the light at that point. We can then use that brightness to create a custom colour, and assign that colour to the pixel. To make it easier to see we will disable the lines of the polygons, and set the opacity to 1.
This setup lets us simulate a point light shining onto a plane that we are looking directly onto.
If you notices the 0.52 instead of 0.5 on the square that is for seam filling, as we have disables polygon lines for performance reasons, we need to make sure that the squares are slightly larger than the grid so that there are no gaps between them.
Conclusion #
Now that you know how to make a basic pixel grid, you can use it to create more complex visuals.